Sheridan, Wyoming, USA – November 17, 2026
So here’s the thing—a drone can look totally flight-ready, but then you’ve got a loose propeller nut, or the battery’s swollen, or maybe you just smudged the lens, and suddenly it’s not so ready after all. That’s where a proper preflight inspection comes in. You know, turning those little clues into a routine you can actually repeat. And it really matters as you start expanding your operations. I mean, check out the numbers: the FAA’s Aerospace Forecast for fiscal years 2024–2044 shows the small-drone fleet in the U.S. keeps growing, while EASA’s Annual Safety Review digs into reported aviation incidents, including ones with unmanned aircraft. You know, these reports give you some helpful background, but at the end of the day, they’re no substitute for actually getting your hands on the aircraft and giving it a good once-over yourself.Honestly, the whole checklist thing really hits home when you look at what Atul Gawande, a surgeon who’s practically the checklist master, said: ‘Under conditions of complexity, not only are checklists a help, they are required for success.’ Now, he wasn’t talking about drones, but it totally applies to your preflight routine. You’ve got to cover all the bases: frame, propellers, battery seating, firmware alerts, control link, camera, and launch area. And don’t just glance over them—take a good, hard look. That hairline crack near a motor arm? Super easy to miss if the lighting’s poor, trust me.Okay, so here’s the deal: we’ve put together ten practical inspection tips that’ll help you avoid those pesky surprises you’d rather not deal with. And these aren’t just fluff—these are checks you can actually do right at the aircraft, not some generic ‘be safe’ advice you hear all the time. But let’s be honest, a checklist isn’t some magic wand. If you rush through it, stick to outdated procedures, or just assume everything’s fine, it’s not gonna work. So take these steps as a starting point, and tweak them based on what you’re flying, what you’re carrying, and the conditions you’re in. Honestly, spending a few extra seconds to double-check something can save you from a whole lot of hassle later.
 Start With 14 CFR §107.49: Assess Aircraft Condition, Controls, and Hazards
Before takeoff, 14 CFR §107.49 calls for a practical check of the aircraft, control links, and operating environment. Look over the frame, propellers, battery, and landing gear for cracks, looseness, swelling, or debris. Confirm the battery is secure and the aircraft’s settings match the planned flight. Small defects matter.
Check that the control station communicates reliably with the aircraft. Move the controls and confirm the expected responses before launching, following the aircraft’s operating instructions. A warning that clears after a restart still deserves attention. I have seen how easy it is to treat a familiar setup as automatically safe; it isn’t. Pause and investigate anything unusual rather than hoping it will resolve in the air.
Then assess the conditions where the aircraft will actually fly. Note wind direction, gusts, nearby people, overhead wires, trees, and changing weather. Check for obstacles along the planned route, not only around the launch point. Make sure the area offers a safe place to land if the plan changes. Take a moment.
A quick phone check or rushed glance can miss a hazard, especially when the site is noisy or crowded. Record defects, correct what you can, and postpone the flight if the aircraft or conditions are not safe. A checklist helps, but judgment still matters.
Part 107: 400 ft AGL, 3 SM Visibility; Clouds 500 ft Below/2,000 ft Horizontal
Before takeoff, check the actual weather at your launch point, not only the forecast. Under standard Part 107 limits, keep the aircraft at or below 400 feet above ground level. Maintain at least three statute miles of flight visibility from the control station. Stay at least 500 feet below clouds and 2,000 feet horizontally from them. These are operating limits, not suggestions for judging a comfortable flight.Tip: Look up and around. A low cloud bank can drift closer while you prepare. Check visibility along the planned route, too. Three miles is not the same as a reliable video or control link. If haze hides distant landmarks, delay the flight. A quick glance can be misleading; I would rather recheck than guess.Record the ceiling, visibility, wind, and time before launch. Watch for changing conditions, especially near trees or buildings where gusts may be stronger. If clouds approach the required clearance, land while you still have room and time. I sometimes find weather notes feel fussy, but they make a later decision easier to explain and review.
Verify FAA Registration and Remote ID Before Powering the Aircraft
Before powering the aircraft, check that its FAA registration is current and matches the aircraft you are preparing to fly. Recreational drones weighing more than 0.55 pounds must generally be registered; Part 107 operations have separate registration requirements. Keep the registration details available, and make sure the required registration number is displayed on the aircraft. A smudged label can be hard to read in bright sunlight. Check it now, not at the launch site.Remote ID needs the same deliberate check. The FAA’s 2021 Remote Identification final-rule analysis projected about 1.5 million registered drones and 160,000 remote pilots by 2024, reflecting the scale of the compliance task. Confirm that the aircraft’s Remote ID status is active and that its broadcast details appear correctly in the control interface. If using a Remote ID module, check its connection and battery too. A status screen can look reassuring while a setting is wrong. I still find this easy to overlook when a crew is waiting, so I pause and verify the aircraft and controller together. If the aircraft is not Remote ID compliant, confirm that your planned operation qualifies for an applicable exception, such as flying within an FAA-recognized identification area. Don’t assume.
Inspect Airframe, Motors, and Propellers; Ground Any Cracked or Deformed Part
Before launch, inspect the airframe under bright, angled light. Look along each arm, landing point, and screw mount for hairline cracks, whitening, dents, or loose fasteners. Gently rotate each motor by hand with the aircraft powered off. Feel for grit, uneven resistance, or side-to-side play; remove dust before deciding a motor is sound. Check propellers at their roots and tips, where small splits can hide. Compare both blades for bends, chips, and uneven edges. A clean-looking prop can still be damaged. Visual checks are useful, not perfect.FAA’s 2023 UAS by the Numbers fact sheet reported 863,728 registered drones in the United States, including 519,354 recreational and 344,374 commercial registrations. That count is not an accident rate, but it shows how widely these aircraft are used. FAA Advisory Circular 107-2A also calls for a preflight inspection to confirm safe operating condition. Ground the aircraft if any structural part is cracked, a motor feels rough, or a propeller is deformed. Do not bend a blade back or rely on glue. Replace the suspect part, then inspect its matching components again. It can feel overly cautious. Better that than discovering a flaw after takeoff.
10 Professional Drone Preflight Inspection Tips
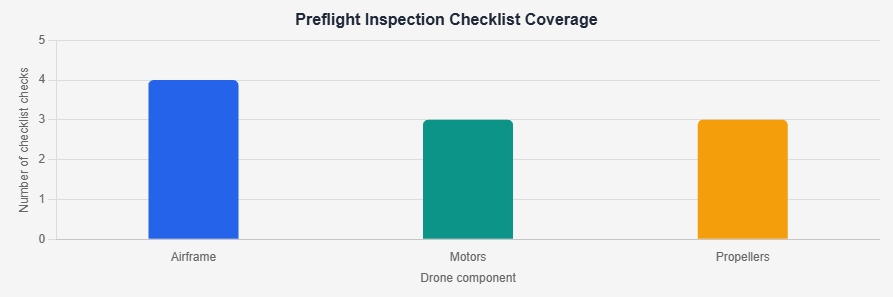
The chart groups ten practical checks: four for the airframe, three for the motors, and three for the propellers. These values represent checklist items, not failure rates or measured risk.
Check the frame for cracks, loose fasteners, and deformation; verify motors rotate freely and have no visible damage; inspect propellers for cracks, chips, warping, or deformation. Ground the drone if any part is cracked or deformed.
Check Battery Cell Balance and Voltage Against the Manufacturer’s Limits
A preflight battery check should go beyond reading the total voltage on a charger screen. Use a suitable cell checker or battery monitor to review every cell, then compare both individual readings and the pack total with the manufacturer’s stated limits. Small differences matter. A pack can show an acceptable total while one cell is unusually high or low.
Take the reading after the battery has rested, and note the ambient temperature if conditions are very hot or cold. Check the display twice if a number looks unexpected; a loose connector or poor contact can produce misleading results. Do not guess. If any cell falls outside the stated range, or the imbalance exceeds the manufacturer’s allowance, set the battery aside and follow the maker’s inspection guidance. Do not fly it to see whether it performs normally.
Keep a simple record of readings for batteries used regularly. A gradual shift across several flights may be easier to spot in notes than from memory. I once trusted a total-voltage reading too quickly; the individual-cell check would have caught the concern sooner. That small extra step is worth the pause. If readings remain inconsistent, stop using the pack until its condition has been assessed.
Test Control Link, Failsafe, GNSS Lock, and Home-Point Accuracy
Before takeoff, stand beside the aircraft and confirm the control link responds smoothly to small stick inputs. Check telemetry for warnings, then review the configured failsafe action and its trigger conditions. Where the operating procedure allows, test the failsafe on the ground with propellers removed. Never create a lost-link event in flight just to see what happens. The FAA’s Advisory Circular 107-2A emphasizes preflight checks and familiarity with aircraft procedures. A menu setting alone is not proof that the aircraft will behave as expected.
Wait for a stable GNSS fix, then confirm the recorded home point appears where the aircraft is actually positioned. GPS.gov reports typical smartphone GPS accuracy of about 4.9 meters under open sky; an aircraft receiver can differ, and nearby buildings or trees may worsen reception. Treat the map pin as an estimate, not a surveyed point. Compare it with a clear landmark and check that the displayed coordinates make sense. I still find this check easy to rush. A few extra seconds can catch a home point set near the launch area, but not at it. If the position drifts, the satellite count fluctuates, or the link warning returns, pause and investigate before launch.Sources: GPS.gov, “GPS Accuracy”; FAA, Advisory Circular 107-2A.
Confirm Payload, Takeoff Mass, and Wind Remain Within OEM Limits
A safe preflight begins with the aircraft’s actual takeoff mass, not its empty weight. The FAA’s Advisory Circular 107-2A explains that equipment on board or attached to the aircraft counts toward its weight. In the United States, the 55-pound Part 107 ceiling is a regulatory boundary, not an OEM-approved operating target. Payload, batteries, landing gear, and accessories all add mass. Weigh the complete aircraft on a level scale, then compare the result with the manufacturer’s takeoff-mass limit. Small margins matter. A payload listed as compatible may still leave too little capacity for other equipment. Check again after every configuration change.Wind limits are equally specific to the aircraft and payload. Do not treat a general forecast as an OEM limit. The FAA Aviation Weather Handbook describes gusts as reportable when peak wind exceeds the average by at least 10 knots. That is a weather-reporting convention, not a safe-flight threshold. Read the operating manual for wind limits, including any lower limits for heavy payloads. Then compare those limits with conditions at the takeoff point, where buildings or tree lines can create uneven airflow. A handheld meter can help, but one reading may miss a sudden gust. If the payload, mass, or wind picture feels uncertain, pause and reassess rather than relying on yesterday’s setup.
10 Professional Drone Preflight Inspection Tips – Confirm Payload, Takeoff Mass, and Wind Remain Within OEM Limits
Illustrative example only: Sample measurements and limits below describe a hypothetical aircraft and are not universal operating limits. Before flight, verify the applicable aircraft, payload, battery, weather, and operating limits in the current OEM documentation and site procedures.
| # | Inspection item | Professional check | Example record | Result |
|---|---|---|---|---|
| 1 | Payload identification and condition | Confirm the payload is approved for the aircraft, undamaged, correctly attached, and secured against movement. | Payload: 1.2 kg; approved payload capacity: 2.0 kg (example). | Pass — within example capacity |
| 2 | Payload balance and center of gravity | Check that the installed payload and mounting position keep the aircraft within the OEM-approved center-of-gravity range. | Mounting position checked against aircraft documentation; no loose movement observed. | Pass — verify range in OEM documentation |
| 3 | Takeoff mass | Calculate takeoff mass with the flight battery, payload, accessories, and any other installed equipment included. Compare it with the aircraft’s applicable maximum takeoff mass. | Calculated takeoff mass: 8.0 kg; example maximum: 9.0 kg. | Pass — below example maximum |
| 4 | Wind at the operating area | Measure or obtain current wind information at the site, account for gusts, and compare conditions with the applicable OEM limit and mission requirements. | Observed wind: 4 m/s; example operating limit: 8 m/s. | Pass — below example limit |
| 5 | Weather and visibility | Check for precipitation, poor visibility, temperature, and other weather conditions that could affect aircraft performance or exceed documented limits. | Dry conditions; visibility and temperature checked against the flight plan and aircraft documentation. | Pass — conditions acceptable for this example |
| 6 | Battery condition and charge | Inspect the battery for damage, swelling, loose connections, or abnormal temperature. Confirm charge is sufficient for the planned flight and required reserve. | Charge: 95%; battery inspection: no visible damage; planned reserve included. | Pass — meets example mission plan |
| 7 | Propellers and motors | Check propellers for cracks, chips, deformation, and correct installation. Inspect motors for obstruction or unusual resistance. | All propellers secure and visibly undamaged; motors clear of debris. | Pass — no issue observed |
| 8 | Airframe, landing gear, and fasteners | Inspect the airframe, arms, landing gear, and accessible fasteners for damage, looseness, or interference with moving parts. | Airframe and landing gear visually checked; no loose parts found. | Pass — no issue observed |
| 9 | Flight controls, link, and navigation | Confirm the control link is stable, the correct flight mode is selected, navigation status is suitable, and required control inputs respond correctly. | Control link stable; control response checked; navigation status reviewed. | Pass — system checks complete |
| 10 | Home point, return settings, and site hazards | Verify the home point and return settings, check that the planned route and landing area are clear, and identify people, obstacles, and airspace constraints. | Home point confirmed; return height checked against local obstacles; landing area clear. | Pass — site review complete |
MMC Skylle II for Public Safety, Mapping & Inspection: Insights from Drone Industry Insights’ Drone Market Report 2024
MMC Skylle II hexacopter drone for public safety, mapping, inspection
Public safety, mapping, and inspection teams increasingly need aerial platforms that can stay aloft longer, carry specialized equipment, and deliver consistent data. Industry analysis in 2024 points to growing demand for drones that support practical, repeatable operations—not simply short flights or impressive specifications. For emergency assessment, infrastructure surveys, and large-area mapping, endurance and payload capacity can directly affect how much work a crew completes in a single deployment.Engineered for power, precision, and endurance, this platform combines a payload capacity of up to 15 kilograms with a flight time of up to 100 minutes. That combination gives operators room to carry mission-specific cameras and sensors while covering more ground before returning to land. Longer sorties can help reduce interruptions during inspections, support broader mapping coverage, and provide public safety teams with a sustained aerial view of changing conditions. By bringing substantial lift, extended flight time, and dependable data collection together, the aircraft is designed for demanding fieldwork where efficiency and clear situational awareness matter.
Conclusion
A Professional Drone Preflight Inspection begins with a careful assessment of the aircraft, its controls, and the operating environment. Confirm that weather and visibility meet applicable flight requirements, including limits on altitude, visibility, and distance from clouds. Before powering up, verify that the aircraft’s registration and Remote ID are in order.Inspect the airframe, motors, and propellers for cracks, damage, or deformation, and do not fly with any compromised part. Check battery cell balance and voltage against the manufacturer’s limits. Then test the control link and failsafe functions, confirm a reliable GNSS lock, and verify that the recorded home point is accurate. Finally, ensure the payload and takeoff mass are within the aircraft’s operating limits and that wind conditions are suitable. These checks help identify problems early and support a safer, more predictable flight.
About Us
We turn drones from tools into infrastructure, enabling the global low altitude economy with engineering rigor and compliance.To become the core infrastructure provider for the global low altitude economy. We will keep integrating 5G, AI and hydrogen energy to drive standardized, intelligent and green aerial operations.
Media Contact
Company Name: UUUFLY AeroTech Corp.
Contact Person: Media Relations
Email: Send Email
Country: China
Website: https://www.viscolift.com/
Press Release Distributed by ABNewswire.com
To view the original version on ABNewswire visit: Professional Preflight Inspection Procedures Ensure Maximum Operational Safety for Commercial Drones
Media gallery